As promised, here's the final part of the Greenhouse Construction Details. Below I'll describe how to put the door together, how to create some interesting door hinges, and the best part of all - how to make the PVC clips that hold everything together.
9. Doorway Frame.
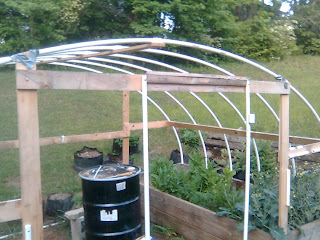
To the doorway header, I attached 2 vertical PVC pipes from the ground to the header. Drive metal stakes into the ground directly under the header with several inches out of the ground and slide the PVC onto the metal stakes before attaching to the header with screws and nuts.
The width should match the width of your door. Additionally, attach a small PVC pipe between the end of the raised bed next to the door to each side of the door frame vertical PVC pipes with bolts (yes you'll have to drill through the metal stakes - that's why I like hollow ones here).

10. PVC Door.
Construct the door out of PVC using elbow joints at the corners and two Tee joints to create a horizontal support in the center of the door. Make sure that this exactly matches the PVC opening created in the previous step. On the right side of the door, I added two couplings making the right side having 4 smaller pieces of PVC pipe. The right side construction from top to bottom is 90 degree elbow, PVC pipe, coupling, PVC pipe, Tee joint, PVC pipe, coupling, PVC pipe, and 90 degree elbow. This seems to be a lot of work but there is a method to my madness as you'll see. I suggest that you put this together WITHOUT glue!
11. Door hinge.
This part was a bit tricky, but the concept is that we will use a 1 inch coupling and let the 3/4 inch coupling fall down into them; holding the weight of the door and forming a hinge. Place the door against the PVC opening (created in step 9 above) and make a mark on the PVC door frame opening (step 9) at about 1/2 inch or so above the bottom of each coupling on the right side of the door.

Drill a hole in the bottom of one side of the 1 inch couplings (just below the ridge) and through the door opening at your marks. With some work, you can wiggle the 7/16 inch bolt and washer at an angle through the hole on the 1 inch coupling, leaving the bolt head on the inside of the coupling. You may have to bore the hole a little larger in order to get this to work. Insert the bolt through the hole in the PVC door frame opening and tighten the nut down on the inside. Do this for both 1 inch couplings.
12. Attaching the door. Take apart the PVC from below the coupling on the right side of the door, lift the door and slide the 3/4 inch couplings into the upper side of the 1 inch couplings and reattach the PVC to the 3/4 inch couplings. If you've done everything right, the door's 3/4 inch couplings should be mounted inside the 1 inch coupling hinges and should swing free; though you may have to lift the door a bit before opening. Check to see that the door lines up with the PVC opening created in step 9.
13. Side Wall attachments. Add a length of PVC pipe along the ground at the back of the two raised beds. You may want to drill a hole in the middle of the pipe to be able to drive in a "hold-down" stake in the middle of the pipe. This will hold the plastic securely against the ground.
14. Attaching the plastic. The trick to this is to have some help and do it on a windless day! Open the plastic sheeting and lay it out on the ground with the long side parallel with the arch of the greenhouse.
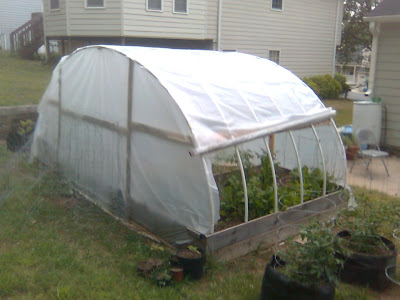
Before you put the plastic on, inspect your work and make sure there are no sharp edges or bolts protruding from the structure that could snag or tear the plastic. Carefully take the plastic and begin to slide it onto the structure. I made the edge of the plastic just overlap the front corner arch of the greenhouse.
Leave enough on the back side to cover it completely and remove the excess by cutting along the ground. Keep the excess in as large a single piece as you can. When done with this step you should have enough plastic to cover the front side (and door) with the excess cut off. Begin to attach using PVC clips on the outside edges every 8 - 12 inches. If you can, keep the back side and top in a single piece of plastic. It may take some creative folding and re-trimming from the inside to remove the excess.
15. Cover the Front Side. Use the excess plastic to cover the front side (omitting the door for now). Unclip the clips along the front edge arch and tuck the front side plastic under the top plastic and re-clip, cutting out a hole for the door PVC frame but leaving 6 inches or so overlapping to be able to secure with clips.
16. Cover the PVC door with plastic, clipping it as you go to give you a tight fitting door. Leave approximately 6 inches of plastic on each side of the door for this.
At this point everything should be covered in plastic. In order to secure the sides at the bottom of the raised beds, I took 1" x 2" strips and ran them along the short ends of the raised beds and along the doorway header, screwing these in place. I clipped down the bottom of the back side between the beds with clips to the PVC running along the ground on the front an back.

17. Side roll-ups. Attach the ends of the plastic on each side of the arch between two 1" x 2" boards screwed together. If you've left some overlap on each end, you want the side roll-up boards to be just above the ground and parallel to the bottom of the raised bed. Cut the plastic along the back arch of the greenhouse to just above the horizontal support 1 x 4's (step 4). Attach the plastic from the back side, along this cut, back to the outer back arch with clips spaced 12 - 14 inches apart.
To raise the sides of your greenhouse for ventilation, detach the clips on each side of the arch up to the horizontal support (step 4). Beginning at the bottom of each side, roll the sides up along the arch until you go just above the horizontal support. Insert the two pegged shelf supports in the holes drilled in the horizontal support and unroll the plastic until it rests on the support.
Making PVC Clips - The Secret to Success!
There is at least one company who makes the clips for attaching the plastic to the PVC, but I, being a DIY-er, decided that it wouldn't be too difficult to make my on. So, I'm going to let you in on the secret to successfully holding the plastic covering in place. Here's how I did it.
1. Start with thin-walled PVC. This is critical! You will have to be able to bend open the clip to get it around what the clip is being attached to; so, thick-walled PVC that you used for the arch ribs will not work! Don't waste your time trying it.
2. Mark PVC for Cuts.
Take a length of PVC (I did an 8 ft. section at a time) and remove a section of the PVC down the length of the pipe resulting in a remaining pipe that looks like the letter "C".
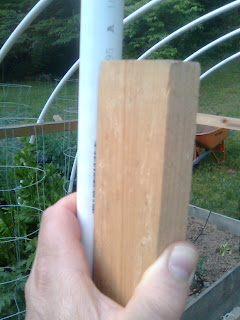
The best way that I found to get a consistently usable cut when using 3/4 inch PVC was to take a 1 x 2 board and hold the "1 x" edge against the side of the pipe length-wise.

Using a pencil, mark the edge of the PVC pipe along both sides of the the "1 inch" edge of the board. This small section is what you will take out of the pipe. The part that you have left will look like the letter "C" and is what holds everything securely together.
3. Cut and remove unneeded section. To cut along this line safely, I used the Dremel Multi-Max tool that cuts through wood and other materials like a osculating saw. You're going to have a bunch of PVC residue, so be ready to clean up the mess.
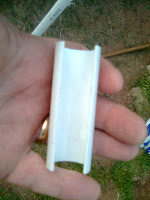
4. Cut into Pieces. Once this section is removed, cut the PVC into small 3 inch sections. You're ready to attach these to the existing ribs to hold down your plastic! And like I said, they held under 4 inches of snow.
If you don't get everything clipped down, the wind can catch a corner just right and pop these off, but their easy enough to get on and off. Additionally, if you're not careful with putting these on and taking them off, they can make small holes in the plastic sheeting. I experimented with trimming the corners of some at 45 degree angles, but it proved to be fairly labor intensive and I didn't want to take the extra time.
If you make the sides of the "C" clips too far apart, they will not keep the plastic sheeting on and if you make them too close together, they will rip holes in the sheeting and will be hard to remove. Do a few trial runs to get yours the way you like them.
During the summer, I take all the plastic off and remove the horizontal support 1 x 4 on the back side to be able to walk through the entire structure. I remove the door from the hinges (remember it wasn't glued?) and I clip all of the clips to the door and door cross supports and store this in the garage.
There you have it... that's how I constructed my greenhouse. I may add another post about passive heating options later.
Enjoy your greenhouse!
Chris
3GT
This is so great to have these instructions. Much appreciated. I would love to try this out on of our garden spaces.
ReplyDelete